Thursday 7 May 2009
Final Conclusions
Overall, I feel that my idents have worked well and portray the image of the Discovery Channel well. A few improvements could be made, sound could have been added if there was time and more modelling techniques could have been used. I found the whole module very challenging and struggled to complete the three idents in the time given, along with work from all the other modules. However, I have felt I have learned quite a few techniques with a piece of software I had limited knowledge with. Hopefully, it has all turned out well and 3 successful idents have been created!
Ident 3: Electrons
The idea for the electrons ident was to first view a room of machinery and equipment and a large pipe, then the camera would cut to an inside look at the pipe and finally, a side cutaway with two sets of electrons crashing into each other.
The first part of the scene was made with basic boxes for the floor and two walls, cupboards, machines and boxes on the floor. A set of shelves were also made with boxes for the wall. The pipe running through the room was created with a cylinder and a bend modifier. Two other straight cylinders were joined to the bent cylinder to fill the room with the pipe. A smaller pipe was created by cloning and uniform scaling the larger cylinder pipe. Two boxes were put together at right angles to create the brackets to hold the pipe in place.
The second scene for the inside of the pipe was created with a long tube and another bend modifier to mimick the bend from the original scene. This was cloned and added on to double the length. Small spheres were created to act as electrons that raced through the pipe.
The final scene was created by drawing another very long tube and placing a box through half of it along it's entire length. A pro boolean was then used to remove half of the tube giving a cutaway effect. More electrons were created at either end of the tube that would race together before crashing into each other.
For the first scene, the materials are rather basic. A silver grey metal shader was used for the pipe running through the scene. A black blinn shader with high specular and glossiness level were used for the brackets holding the pipe. Two different shades of wood map were used for the boxes and shelves on the wall. Bitmaps of different pieces of machinery were applied to the boxes around the walls to make them look like real machinery in the scene. A Tiles map was used for the floor with tiling of 1.3 in both axis. This created a good floor tile effect. The walls were a basic colour. Finally, the Discovery logo was placed onto a box on the wall in the right hand corner.
For the inside pipe scene, the same metal shader grey was used for the pipe. A glossy yellow Anisotropic shader was used for the electrons.
The final scene was slightly more complex. The same grey metal and yellow anisotropic shaders were used for the pipe and electrons. For the explosion, a Particle Array was used with a Wind Force bound to the array. This linked to a cylinder in the middle of the tube. The pArray was set to run from frame 200 to 400. This allowed the electrons to race in for the first 200 frames and the pArray to run for the next. The material used on the particle array was a blinn shader with several maps attached. A particle age map was added first and in the parameters, two noise maps were also created. The colours for these were yellow and red and a grey without a noise map. The first colour had an age of 10% whilst the second colour had an age of 60%. All together this created a realistic fire effect. This was added to the particle array.
In the first scene, a Target Spot light lights up the main scene whilst an omni light high above gives more ambient light. The camera tracks in from a distance to close to the pipe bend in the centre of the scene. This happens over a space of 200 frames. When rendered this was too quick so in Premiere Pro, it was slowed down 50% to give a slow zoom into the scene.
The next scene shows the camera following electrons round the tube. This was done with splines. Two spline arcs were added to the inside of the tube running through the centre. Using path constraints, the camera was linked to one and the electrons group was linked to another. When the timeline was played, the camera followed the electrons around the inside of the pipe. This was rendered and formed the next section of the ident.
Two quick shots were created by tracking a camera along next to the pipe cutaway whilst the electrons travelled through it. A shot was created in either direction and added to form an extra part to the ident.
The final scene was the two sets of electrons coming together. The first 200 frames show the camera zooming into the centre and the two sets of electrons travelling in from either end. At 200 frames, the particle array starts which starts of the explosion. The two sets of electrons move through the back wall of the tube to give the impression of disappearing in the explosion. The particle array runs for 200 frames. This is the final section to the ident.
The four sections are linked together in Premiere Pro with cross dissolve transitions. The final ident shows the start of inside a room, moving inside the pipe travelling with the electrons, seeing electrons travel in either directions and finally see the two collide and explode. As they explode, the Discovery Channel logo appears and then the ident fades to black.
Ident 2: Science Table
The idea for the second ident for the discovery channel was a table showing different science equipment and apparatus. The ident would start with zooming in on the table, then travelling around the table and finally landing on the Discovery Channel logo.
The table was created with a large, flat box drawn into the viewport. Four narrow cylinders were drawn and attached to the box to create the table legs. The paper on the table was created by three very thin boxes drawn and placed on top of each other, rotated slightly to show three bits of paper. The petri dishes were created by drawing a thin cylinder for the base and then adding a tube on top, the same diameter and a small height dimension. The same method was adopted for the beaker but with a larger height diameter on the tube for the sides. The test tube rack was created with 4 boxes created and placed at ends to form a hollow box. The holes in the top were created by drawing four cylinders and placing them through the top. A Pro Boolean was then used on the top to remove the cylinders, leaving a top with four holes. On the base of the test tube rack, four spheres were placed and the same technique of using a Pro Boolean removed the spheres leaving a small indent. The test tubes were created with a tube for the main body and a sphere for the bottom rounded section. A pro boolean was used again to cut the sphere in half. These were grouped together and cloned to create 3 test tubes. These were then placed into the test tube rack previously created. The bunsen burner was created with lots of different sized cylinders and a cone for the base. These were placed together, whilst looking at real images of bunsen burners to get the desired effect. Another longer cylinder was then used with a bend modifier for the gas pipe coming out of the tube. The bunsen burner stand was created with a torus for the top and four cylinders for legs.
Finally, the flame for the Bunsen burner was created with a sphere gizmo and a fire effect added to it. The levels were tweaked until the desired effect was achieved. This was then placed over the top of the bunsen burner model.
A range of materials were used to bring the table to life. A wood map was used for the table top. A grey blinn shader was used for the table legs, bunsen burner and stand. The metal effect was created by adding a light grey ambient and diffuse colour, changing the white specular level to 77 and increasing the glossiness to 23. A bitmap map was used with a picture of an A4 document to add to the paper on the desk. This gives the effect of really being a document on the table. The bottoms of the petri dishes had bitmap maps added to them with images from real petri dishes. These images were tiled 10 times in both axis to give a good effect. The clear effect for the side of the petri dishes, beaker and test tubes was created with an off white blinn shader with the opacity set to 27. Another cylinder was placed inside the beaker with a light colour to give the effect of liquid inside. Finally, another bitmap was used on a map for the Discovery Channel logo in the bottom left hand corner of the table.
A target spot light was placed above the table, flooding the table scene with light. The hotspot/beam was set to 100 to cover the whole table. An omni light was also placed slightly off the scene to the front to add a little more ambient light.
A free camera was placed in the top right hand corner of the scene with a very wide angle lens. Over the period of 400 keyframes, the lens was set to very telephoto so by the end of the animation, the camera was highly zoomed into the table. This was the first section of the ident.
The second section consisted of a camera tracking right to left over the entire table. It then ended up on the sheets of paper placed on the table in the scene. Finally, the camera moved round and centred on the discovery logo on the table. This ended the ident.
The clips were imported into Premiere Pro and linked together, again with cross dissolve transitions. The zoom into the table was slowed down to 50% as it was too fast from the render from 3DS Max. Finally, the camera stops on the Discovery logo for a few seconds and then the video fades to black.
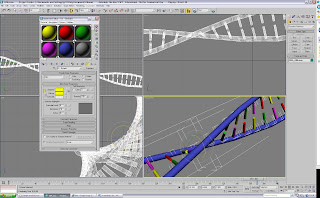
Ident 1: DNA
My first ident for the discovery channel is looking at DNA. The scene starts with a single strand of DNA turning, moves onto vertical strands of DNA and finally ending with travelling through a strand of DNA.
The DNA strand was created by drawing two thin, parallel cylinders into the viewport. Between these cylinders, smaller, thinner cylinders were drawn and placed along the entire length. The whole section of DNA strand was then selected and grouped together to form a single object. A twist modifier was then added to the group along the X axis with an angle of 180 degrees. This provided the shape required for the DNA. The group was then cloned four times and placed next to each other forming a long strand of DNA with many twists in it.
To make the DNA more authentic, materials were added to the strands. 5 main materials were created for the 5 different sections of the DNA strand. The main outer of the DNA strand was a Blinn shader with a Blue Ambient and Diffuse colour. The glossiness was set to 10. This was then applied to the two parallel cylinders of the DNA strand. Then, four other materials were created similarly with different ambient and diffuse colours of Yellow, Red, Green and Pink. These were alternately applied to the smaller cylinders to mimick a real DNA model.
For the first part of the animation, a camera was placed at the side of the strand in a similar position to the perspective viewport. Over a period of 400 keyframes, the DNA strand was rotated along it's X axis. When the timeline was played, the DNA strand was slowly rotating. This scene was rendered to form the first section to the ident.
The next section consisted of lots of vertical strands of DNA. The strand created earlier was moved to a vertical position and cloned 18 times. The heights and original positions of the strands was adjusted so they did not all look uniform. Over 400 keyframes, the strands were set to rotate as in the first scene but at different times to make them look different. A spline was drawn as a path through the strands of DNA. A free camera was placed in the viewport and a path constraint linked to the spline created. The camera was then set to follow the path over 400 keyframes. This view was then rendered to provide the second section of the ident.
Finally, a free camera was placed at the end of one of the DNA strands and over 400 keyframes was moved through to the other side, along the entire length of the strand. The strand was also set to rotate as in all the other scenes. The final view was of the camera moving through the spinning strand.
The three rendered scenes were imported into Adobe Premiere Pro and linked together with a cross dissolve transition. At the end of the 3 rendered scenes, a static plate with the channel logo was placed on the timeline with a zoom transition. When the video was exported, the ident was complete.
Thursday 29 January 2009
First Animation in 3DS Max
Well, back for the second semester and now starting animation!
For our first tutorial, we learned about the basics of animation and key framing. My first video below shows how I animated a torus knot.
First, I drew out the knot onto the viewport then switched on the auto key framing tool. Then, I moved the timeline slider along the bottom along by 20 frames and then moved and rotated the torus knot. I repeated this step about 10 times until finally ending up back where the torus knot had started. When playing this back, the torus knot moves and rotates its way around the viewport.
Secondly, I created a sphere in the viewport and then, using a similar approach to the previous animation, I used the scale and move tools to modify the sphere at different times on the timeline. After I had done this, I opened up the graph editor and played around with some of the lines, changing how certain movements occurred and their speed. When I had finished, I exported the animation as an avi file and the result is shown below!
Wednesday 10 December 2008
Semester 1
Thoughts
Overall, I am quite pleased with what I have come up with during this semester, looking at 3D Studio Max. However, I did come across a few problems I hope to sort out before next semester.
The version of 3DS Max I was using at home and on my laptop was newer than the version used at the University. Unfortunately, that meant the work I had created at home couldn’t be opened on the university machines. Therefore, I had to work from my laptop which wasn’t easy as the screen wasn’t quite big enough and I didn’t always have a mouse, so in the end, I did most of my work at home on my desktop computer which with large monitors was much better. However, I hope to find a different version for my computer before semester two so I can open my work on the university machines as well as my own.
Targets for Next Semester
For next semester, I am going to try to organise my time better and set regular small targets to ensure that I get all the work completed in time. Although I finished all the work for this semester, I still feel with some more time which I could have gained earlier on, would have helped produce some better work.
I am also going to try to keep my blog more up to date with regular updates and entries, something which I didn’t do too well this semester.
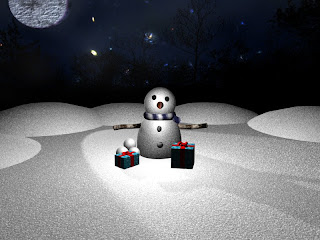
December Image
For my December Image I chose to focus on a snow scene and a snowman. I felt this image went quite well and I am pleased with the finished result. I could have maybe added some more elements to this image. Here is how I created this image.
 Creating the Scene
I started by creating a thin cylinder with a large radius to sit the whole image on. I then created a box at the back of the cylinder to act as a background. I made this thin but tall and wide enough to fill the entire viewport. I then also added some spheres to the back of the image as small hills just to break up the horizon line a little as it looked very bare without them. I drew out several different sized spheres and placed them mostly below the surface with the top section sticking out over the top.
Creating the Snowman
To create my snowman, I drew two spheres, one larger than the other and positioned them on top of each other. I then converted them to editable poly so I could manipulate the spheres to make them look less like two perfect spheres. I used the soft selection tool and pulled the image around until I was happy with the finished result. I then positioned these spheres above the base so it looked like the snowman was built on the ground.
I then created 4 small spheres of different sizes to use as the eyes and the buttons on the front of the body. I also converted these to editable poly and modified them slightly so they were not perfect circles. I then positioned these and rotated them to the correct position on the snowman’s body.
To create the carrot nose, I drew out a small cone, rotated it 90 degrees and positioned it onto the snowman.
I created a torus to go around the snowman’s neck to look like a scarf. Once I had converted this to editable poly I then extruded a small portion of this to make it look like the tail end of the scarf. I then positioned this around the neck of the snowman which I felt looked quite good!
I created two sticks for the arms in the same way I did the November scene by taking a cylinder, converting it to editable poly and pulling it around until it was no longer straight and a perfect shape. I cloned this and positioned it on the other side of the snowman’s body. I rotated the shape around a bit so they did not look identical to each other.
Creating the Extras
I drew out a small sphere to use as a snowball for the scene. I cloned this 3 times and positioned them so there was a pile of snowballs next to the base of the snowman.
To create the presents, I drew out two boxes of different shapes and positioned them roughly where I wanted them in the scene. I added ribbon by creating small, thin boxes and positioning them to look like some ribbon covering the presents. To finish these off, I added a torus knot on top to look like the bow on top of the presents.
Adding Materials
For the presents in the scene, I took an image of some wrapping paper and applied it as a map to a Blinn material which I then applied to the boxes. The ribbons and torus knot are simply coloured red as I felt they looked ok without any materials or maps on them.
For the scarf, again, I used an image of a scarf from the internet, edited it in Photoshop slightly and then applied it as a map to the scarf. I had to tile the map by 10 in both directions and also rotate the map by 90 degrees. This gave me the look I was after for the scarf.
For the stones in the front of the snowman, I used a stone texture and added that to a material as a map which I then simply applied to the stones and it worked quite well as a texture.
Using an image of some bark like I did with my November image, I created the material for the sticks. I tiled the map by 3 and 5 to get the look I was after for the twigs. As the shapes were not identical, the fitted the material differently and this made them look even less alike which was good.
To create the snow, I found a couple of tutorials to read through. I don’t think this produced the best snow effect but I couldn’t find anything better to use. I created a Bump map which was a mix between a Cellular map and a Noise map. The noise map was just black and white whilst the cellular map consisted of some darker greys as well as white and black. I then applied this material to the snowman and the surroundings. I tweaked the parameters slightly on the material to try and get a good snow look but it was the best I could come up with.
Finally, the background image comes from the internet and is applied to the box at the back of the scene.
Finishing Touches
I added a Target Camera at the front of the scene, quite low down to give the perspective feel which also helped with the hills on the horizon. I played around getting the position of this just right for quite a while!
I added two omni lights to the scene, one at the top and one at the bottom to give the scene enough light so everything was visible.
I also added a Target Spot light from behind which simulates where the moon is in the background image. I turned on the shadow map for this light to cast a shadow on the ground, giving an even better impression of moonlight. I played around with the settings for the target light, adjusting the intensity and focus so it was not such a bright spotlight but a more gentle moonlight!
Final Thoughts
I am quite pleased with this image and how it has come out. If I had more time to work on it I would like to have a go at making a different snow material as I am still not 100% happy with how that has come out.
Overall, I am quite pleased with this image and from comments from others, they like it too!
Creating the SceneI started by creating a thin cylinder with a large radius to sit the whole image on. I then created a box at the back of the cylinder to act as a background. I made this thin but tall and wide enough to fill the entire viewport. I then also added some spheres to the back of the image as small hills just to break up the horizon line a little as it looked very bare without them. I drew out several different sized spheres and placed them mostly below the surface with the top section sticking out over the top.
Creating the Snowman
To create my snowman, I drew two spheres, one larger than the other and positioned them on top of each other. I then converted them to editable poly so I could manipulate the spheres to make them look less like two perfect spheres. I used the soft selection tool and pulled the image around until I was happy with the finished result. I then positioned these spheres above the base so it looked like the snowman was built on the ground.
I then created 4 small spheres of different sizes to use as the eyes and the buttons on the front of the body. I also converted these to editable poly and modified them slightly so they were not perfect circles. I then positioned these and rotated them to the correct position on the snowman’s body.
To create the carrot nose, I drew out a small cone, rotated it 90 degrees and positioned it onto the snowman.
I created a torus to go around the snowman’s neck to look like a scarf. Once I had converted this to editable poly I then extruded a small portion of this to make it look like the tail end of the scarf. I then positioned this around the neck of the snowman which I felt looked quite good!
I created two sticks for the arms in the same way I did the November scene by taking a cylinder, converting it to editable poly and pulling it around until it was no longer straight and a perfect shape. I cloned this and positioned it on the other side of the snowman’s body. I rotated the shape around a bit so they did not look identical to each other.
Creating the Extras
I drew out a small sphere to use as a snowball for the scene. I cloned this 3 times and positioned them so there was a pile of snowballs next to the base of the snowman.
To create the presents, I drew out two boxes of different shapes and positioned them roughly where I wanted them in the scene. I added ribbon by creating small, thin boxes and positioning them to look like some ribbon covering the presents. To finish these off, I added a torus knot on top to look like the bow on top of the presents.
Adding Materials
For the presents in the scene, I took an image of some wrapping paper and applied it as a map to a Blinn material which I then applied to the boxes. The ribbons and torus knot are simply coloured red as I felt they looked ok without any materials or maps on them.
For the scarf, again, I used an image of a scarf from the internet, edited it in Photoshop slightly and then applied it as a map to the scarf. I had to tile the map by 10 in both directions and also rotate the map by 90 degrees. This gave me the look I was after for the scarf.
For the stones in the front of the snowman, I used a stone texture and added that to a material as a map which I then simply applied to the stones and it worked quite well as a texture.
Using an image of some bark like I did with my November image, I created the material for the sticks. I tiled the map by 3 and 5 to get the look I was after for the twigs. As the shapes were not identical, the fitted the material differently and this made them look even less alike which was good.
To create the snow, I found a couple of tutorials to read through. I don’t think this produced the best snow effect but I couldn’t find anything better to use. I created a Bump map which was a mix between a Cellular map and a Noise map. The noise map was just black and white whilst the cellular map consisted of some darker greys as well as white and black. I then applied this material to the snowman and the surroundings. I tweaked the parameters slightly on the material to try and get a good snow look but it was the best I could come up with.
Finally, the background image comes from the internet and is applied to the box at the back of the scene.
Finishing Touches
I added a Target Camera at the front of the scene, quite low down to give the perspective feel which also helped with the hills on the horizon. I played around getting the position of this just right for quite a while!
I added two omni lights to the scene, one at the top and one at the bottom to give the scene enough light so everything was visible.
I also added a Target Spot light from behind which simulates where the moon is in the background image. I turned on the shadow map for this light to cast a shadow on the ground, giving an even better impression of moonlight. I played around with the settings for the target light, adjusting the intensity and focus so it was not such a bright spotlight but a more gentle moonlight!
Final Thoughts
I am quite pleased with this image and how it has come out. If I had more time to work on it I would like to have a go at making a different snow material as I am still not 100% happy with how that has come out.
Overall, I am quite pleased with this image and from comments from others, they like it too!
Subscribe to:
Posts (Atom)